

Overview
This article is a comprehensive guide to version control system and Github, which is one of the most popular tools used on daily basis by developers. You will learn about git add, commit, branch, remote, push and many more in this article.
Table of Contents
- Requirements
- Introduction to Version Control System (VCS)
- Getting Started with Git
- Introduction to Github
- Final thoughts
Requirements
To be able to follow this article, you need to have the following:
- Github account
- Git software installed on your machine (computer)
If you don't have any of these, do not fret you can easily get them.
To create github account, click here.
Git can be downloaded from git website. Follow the instructions on the git website on its installation process.
Introduction to Version Control System
What is Version Control System?
A Version Control System (commonly abbreviated to VCS) is a system that keeps track of (records) changes made to a file or set of files over time so that you can recall specific version at a later time.
You would notice that in this definition that file (or files) was mentioned. This is to show that VCS is not limited to only recording changes made to software source code but any type of file that can be stored on a computer.
What is Git?
Git is a distributed version control software, usually used for coordinating work among programmers collaboratively developing source code during software development. Its goals include speed, data integrity, and support for distributed, non-linear workflows (thousands of parallel branches running on different systems).
Purpose of Using VCS
You might be pondering on why do I even need to use VCS? Here are the answers to your question.
VCS allows you to revert (or roll back) a selected file or the entire project to a previous state in case you screw or mess up the code. This feature is really a life saver because at some point you are going to make changes to your code that will break the entire file or code and you won't able to recall how the code was initially when it was working. (Who could memorize hundred of lines of codes not to talk of thousand of lines of codes?🙄🙄)
VCS allows you to compare changes made to files over time, see who last modified something that might be causing a problem.
VCS allows you to develop multiple features at once by using branching model which is a git's killer feature.
Non-Ideal Way of Version Controlling
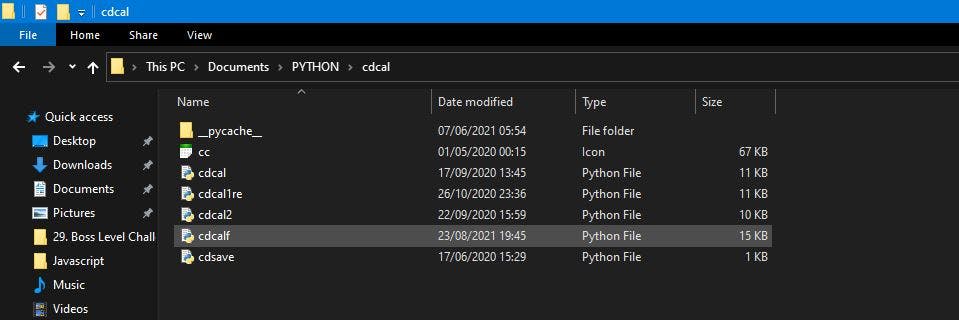
Before I started using Git, I used to make duplicate copy of the file I was working on whenever I wanted to make changes to the file. Doing so, majority of my project directory (folder) ended up having a list of program files named file1.py, file2.py, file3.py, filefinal.py .... Check the attached image to understand this.
In the next section, you will learn how to use Git to save you the stress of doing this in a more compact & intuitive way.

Getting Started with Git
Installation of Git
Windows user: If you had read the requirements before heading to this. You should have the git setup on your computer. By default configuration, you should see it in the Downloads folder. Run the setup file and follow the prompt.
To check if git has been installed successfully, run this command in the command prompt (cmd)
C:\Users\Bovage> git --version
git version 2.27.0.windows.1
NB: You might get a different version depending on the one you downloaded
Configuring Git
NB: At this point, you must have created your Github account.
You guessed right, your github account credential is needed. Git uses them to track any changes made to files by you alongside with your details. To do this, type the following commands
git config --global user.name "YOUR NAME"
git config --global user.email "YOUR EMAIL"
NB: Ensure the email you specify is the one you used to sign up for Github.
Basic Git Commands
git init: is used to initialize a local git repository.git status: displays information about the working directory and staging area.git add: is used to add files to the staging area for tracking.git commit: is used to take snapshot of your code.git branch: is used to create, list and delete branches in the local git repository.git remote: is used to make connection with the remote git repository.git push: is used to send local repository files to remote repository.
Three main Sections of a Git Project
- Working Directory: is the folder where you initialize git repository.
- Staging Area: is a file, generally contained in your git directory( called
.git folderyou will know about this soon), that stores information about what will go into your next commit. You can think of this as an intermediate area that contains only the changes that you want to be part of your next commit. The main reason for this is because you might not want to commit every changes in the working directory in one commit. Staging area gives you the flexibility to do that. - Local Git Repository: is the most important part of Git, and it is what is copied when you send project or file to a remote repo.
All these stuff mentioned above won't be meaningful without talking about the four (4) states that files can be in. They are:
- Untracked means file hasn't been added to staging area.
- Staged means file has been added to staging area.
- Committed means file is safely stored in git repository.
- Modified means file had been committed previously but now changes has been made to the file.

Practise
Knowledge is of no value unless you put it into practice. – Anton Chekhov
Let's put into use this knowledge. Create a folder in your preferred location, it doesn't matter which. Here, I will create the folder in my desktop using cmd. You could use the 'right click : New > Folder' way no difference.
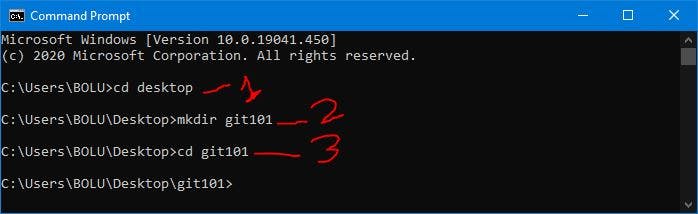 Step 1: change directory to desktop.
Step 2: create a folder named git101.
Step 3: change directory to the newly created folder; git101
Initializing Git Repo
 You have initialized a local git repo in the git101 folder which is your working directory.
If you look inside the git101 folder, you won't see anything. The file explorer should display "This folder is empty". Actually, the folder is not empty. The
You have initialized a local git repo in the git101 folder which is your working directory.
If you look inside the git101 folder, you won't see anything. The file explorer should display "This folder is empty". Actually, the folder is not empty. The git init command creates a .git folder for you. The fact that you can't see something means it is hidden, right? How can we then view hidden files?
In the windows search bar, type 'Show hidden files' and click on it.
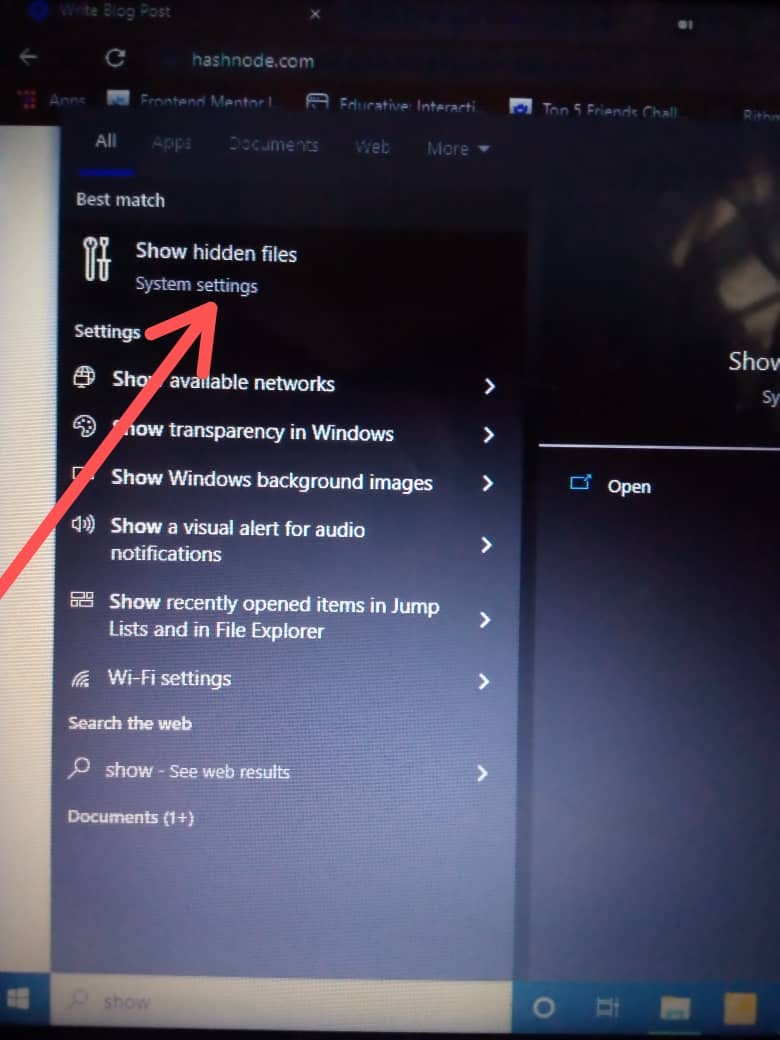 A new window that looks like this👇 will open up.
 Click on
 show settings. Another windows that looks like this👇 will open up.
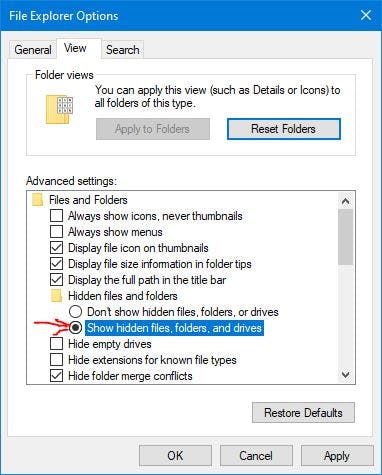 Select the radio button besides show hidden files, folders and drives. Click
 Apply and then Ok.
Now, inside our working directory (git101 folder) you should see the .git folder. Fortunately, you don't have anything to do in the .git folder, but without it you will not be able to use any of the git commands.
NB: Don't forget to turnoff the show hidden files and folders so as to avoid seeing hidden system files.
Adding file
Add index.html to your working directory. The index.html should contain this
<!DOCTYPE html>
<html lang="en">
<head>
    <meta charset="UTF-8">
    <meta http-equiv="X-UA-Compatible" content="IE=edge">
    <meta name="viewport" content="width=device-width, initial-scale=1.0">
    <link rel="stylesheet" href="style.css">
    <title>Document</title>
</head>
<body>
    <h1>Welcome to Git101 Class</h1>
</body>
</html>
After adding the index.html file, type the command git status. You should get this message
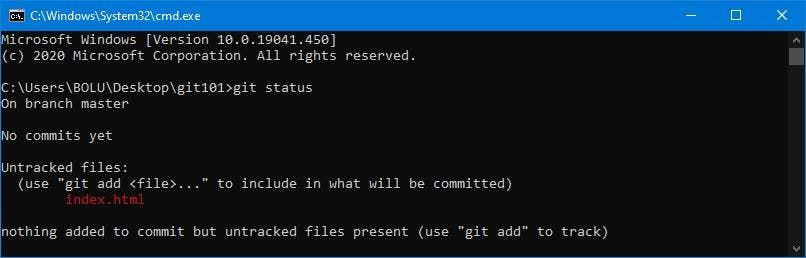 This means the index.html file is in the untracked state.
Now add the file to the staging area by typing the command
This means the index.html file is in the untracked state.
Now add the file to the staging area by typing the command git add index.html. You should get this message.
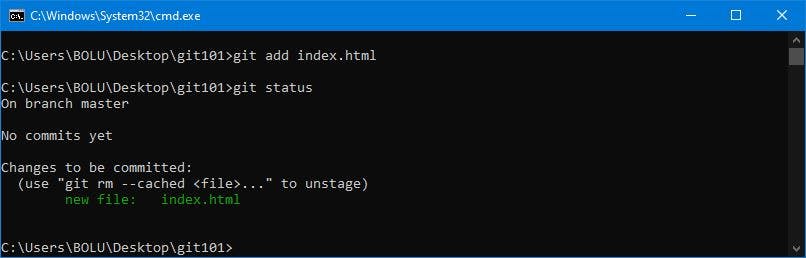 This means the file is now in the staged area ready to be committed.
Committing the File
Since the file is in the staging area, the next step is to commit the file with a message.
NB: More than one changes can be committed at once, just ensure the changes are related.
Type the command git commit -m "first commit". You should get this message.

-m is a flag that allows you to add message to the commit.
To know more about writing git commit messages, read this article.
Git Branch
By default, git creates a branch named master which the index.html file is currently in.
Type the command git branch to get the branches in your git repo. We currently have just one branch which is the one created by default by git.
We just completed the local implementation of git. In the next section while talking about github, you will have your local git repo online on github.
Introduction to Github
What is Github?
Github is a provider of Internet hosting for software development and version control using Git. It offers the distributed version control and source code management (SCM) functionality of Git, plus its own features. It provides access control and several collaboration features such as bug tracking, feature requests, task management, continuous integration and wikis for every project.
Benefits of Using Github
Aside from the VCS benefits available on github, it is also useful for the following purposes:
- It offers permanent storage of repository (it can serve as backup).
- It provides graphical user interface (GUI). Buttons, tabs & cursor (widgets) are used instead of commands.
- Contribution from others: It serves as a platform that enable other people anywhere in the world to have access and contribute to your projects. This makes Open Source Contribution & remote work easier. Many large open source projects are hosted on GitHub, which makes it very easy to examine the code both on GitHub and locally.
- Hosting static website: Github offers github pages that allows you to host your personal, organisation or project's pages.
Using Github
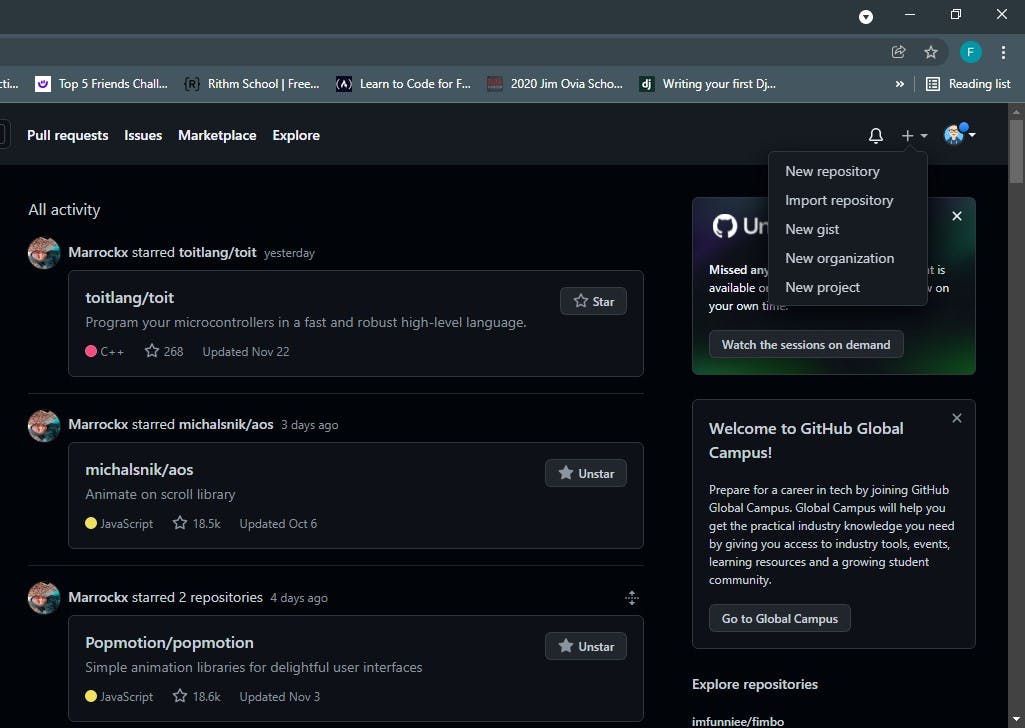
Head on to your github account, Click on the + symbol on the top right-hand side corner of the website and click New Repository.
 You get a page like this one👇
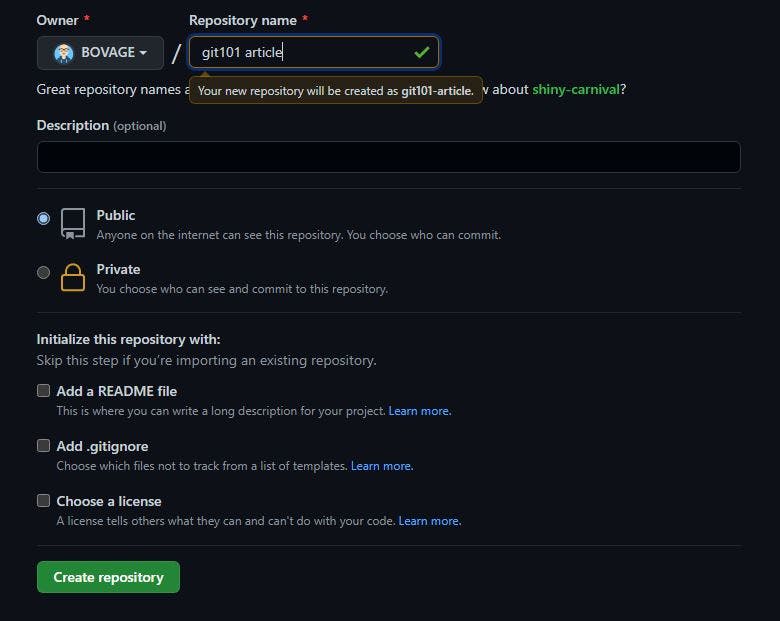 Choose a name for your repo, you can ignore the description and other fields on the page for the sake of this article. For your personal projects and all, you might want to fill the fields.
Click on Create Repository. You should get this page👇
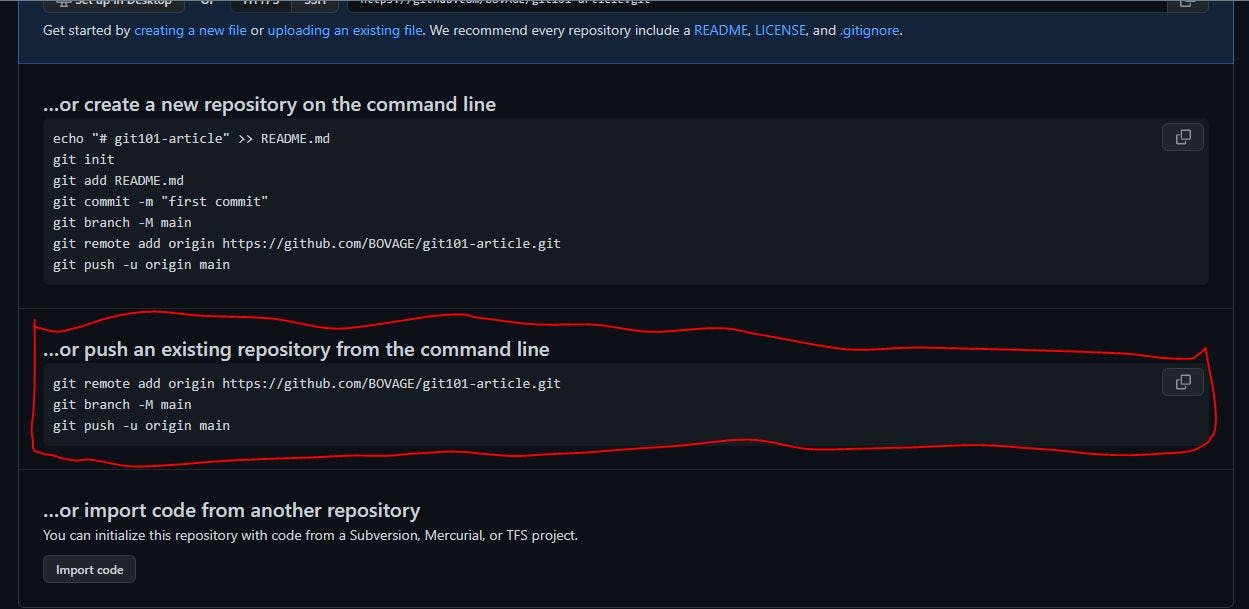 Now, you have gotten to the tricky part (not tricky though). You should give yourself pat on the back for getting this far😊🤗.
git remote add origin https://github.com/BOVAGE/git101-article.git: This command informs your local git repository about a remote repository created online. The remote repository is located at the Uniform Resource Locator (URL); address after the 'origin'. Now if you want to send your files to GitHub, you can just type in git push github.com/BOVAGE/git101-article.git - but typing that whole URL is quite a pain. Instead, it would be better if we could give the URL a nickname (also called an alias) - that is what 'origin' is! By giving it this alias, you cantype git push origin masterfor short to send the code from your master branch to this remote repository.git branch -M main: This command changes the default branch name tomain. NB: The second line can be ignored. All it does is change yourmasterbranch tomain.git push -u origin main: Now you can send your files from the local repository to your remote repository (which we aliased to origin in the 1st command). The -u flag allows you in the future to only have to typegit pushinstead ofgit push origin main.
On October 1, 2020, Github started using
mainas the default branch instead ofmaster.
Hence, the reason for the second line.
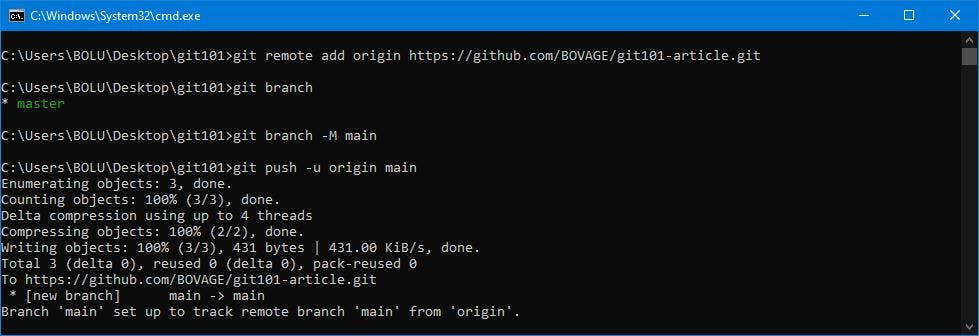
Here is a screenshot of sending the local git repository to Github
NB: Ensure you replace the remote repo url address with yours.
References.
- Scott Chacon, Ben Straub (2020) Pro Git. Mountain View, CA 94042, USA: Apress
- Luis Matos, B. (2021). Git Tips and Git Commit Best Practices . Retrieved from here
Final Thoughts
Practice makes perfect. After a long time of practicing, our work will become natural, skillfull, swift, and steady ~~ Bruce Lee
Ensure you practice more with git and github to reinforce the new knowledge.
Thanks for reading up to this point.
This is my first technical article, I would love to read your feedbacks.
Don't forget to clap, like, comment & share.