


Overview
In this article, you are going to learn about how to build a beautiful, SEO - friendly URL (Uniform Resource Locator) in Django using the slug field and other utilities. The concept of URL encoding was also explored in terms of how it relates to slug.
Prerequisites
This is not an introduction to Django article. Therefore, basic understanding of the following is required:
- Django
- HTML, CSS & JavaScript
What is a Slug?
A Slug is a short label that contains only letters, numbers, underscores, or hyphens. They are usually used in URLS. For example, in the URL of my last blog post here on Hashnode
https://bovage.hashnode.dev/make-your-localhost-available-on-public-internet
This part(called path): make-your-localhost-available-on-public-internet is the slug.
Navigate to the blog post and come back, you should notice something.
Hope you are back. What did you notice?
The title of the blog post is:
Make your localhost available on Public Internet
You will notice that the title of the blog post is somewhat the same as the slug. As you read further, you will know the reason why somewhat is bolded.
Why Use a Slug?
In order for the reason why a slug should be used to make sense, you need to first know about URL encoding.
URL Encoding
URL Encoding is a method that converts non - ASCII characters into a format that can be transmitted over the internet. It replaces non - ASCII characters with a % followed by two hexadecimal digits. Hence, the reason why it is also called Percent Encoding. There are basically two types of characters that can be found in a URL:
- Reserved Characters : need to be percent encoded.
- Unreserved Characters: never need to be percent encoded.
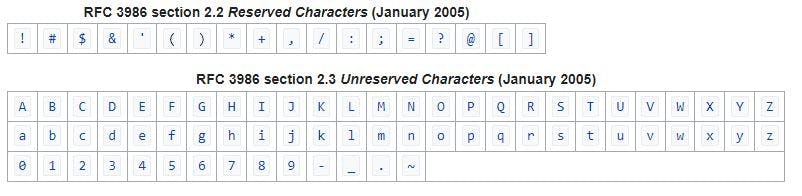 Source: Wikipedia
If the last part of the URL of my last blog post weren't a slug and the title was used as the path without converting it to a slug, this is how the URL would look like
https://bovage.hashnode.dev/Make%20your%20localhost%20available%20on%20Public%20Internet
This does not look good, right? So, what's the difference between the two?
- URLs cannot contain spaces.
- URL encoding normally replaces a space with a plus (+) sign or with %20.
Since slug contains only letters, numbers, underscores & hyphens, that implies that if it is used as a path in a URL there won't be percent encoding. So the URL will look cleaner and more readable.
Having evaluated the two cases, the reason why slug should be used should not be far-fetched.
- It is human-friendly and more readable.
- It aids (Search Engine Optimization) SEO as it helps create consistency in title, heading and URL.
SlugField in Django Model
It is like a CharField where you can specify a max_length attribute. It is often useful to automatically prepopulate a SlugField based on the value of some other field. You can do this automatically in the admin using prepopulated_fields.
Syntax
field_name = models.SlugField(max_length=200, **options)
With that being explained, let's dive straight into django😀.
Post model of a Blog app
models.py file
from django.db import models

class Post(models.Model):
    title = models.CharField(max_length=100)
    slug = models.SlugField(max_length=60, unique=True)
    body = models.TextField()

    def __str__(self):
        return self.title
create a forms.py file in the app's directory that has the following codes.
from django import forms
from .models import Post

class PostForm(forms.ModelForm):
    class Meta:
        model = Post
        fields = ['title', 'slug', 'body']
views.py file
from .forms import PostForm
from django.shortcuts import render

def create_post(request):
    if request.method != 'POST':
        form = PostForm()
    else:
        form = PostForm(request.POST)
        if form.is_valid():
            print('post created')
    context = {'form': form}
    return render(request, 'blog/post_new.html', context)
admin.py file
from django.contrib import admin
from .models import Post
class PostAdmin(admin.modelAdmin):
    list_display = ['title', 'slug', 'body']
    prepopulated_fields = {'slug': ('title',)}
Navigate to the admin page
As you type the title for a blog post, the slug field is being automatically filled based on what you are typing in the title field while removing and replacing characters in the title field appropriately(i.e slugify). Below is a gif of that in action.

You have just seen how auto-populating is done in the django-admin interface. But in a real website, not every user would have access to the django-admin interface.
So, let's implement the same result when creating a new Post via a form on the normal web interface. Since django is open source, you can replicate the behaviour you want by reading the code. In this case, you can see that contrib.admin uses a script called urlify.js to do the dynamic slugging. To check the code on github, click here.
The path to urlify.js is https://github.com/django/django/blob/main/django/contrib/admin/static/admin/js/urlify.js.
You can see that it is located inside contrib.admin and django.contrib.admin has been added automatically inside the installed_apps list of your project's settings. All you have to do is to add load static tag on the top of the html file and link the js file.
Your html file should look similar to this.
post_new.html file
{% load static %}
<form action="" method="post">
    {% csrf_token %}
    {{ form.as_p }}
    <input type="submit" value="Create">
</form>
<script src="https://ajax.googleapis.com/ajax/libs/jquery/3.6.0/jquery.min.js"></script>
<script src="{% static 'admin/js/vendor/xregexp/xregexp.min.js' %}"></script>
<script src="{% static 'admin/js/urlify.js' %}"></script>
<script>
    slug = $('#id_slug');
    title = $('#id_title');
    title.keyup(function(){
        slug.val(URLify(title.val(), 50, true));
     });
</script>
What's happening in the code?
line 7: add jquery link to make the code shorter.
line 8: add XRegExp script as it is used in the urlify.js file. To see that check line 159 of urlify.js file.
line 9: add urlify.js file so we can have access to function URLify(s, num_chars, allowUnicode) which is actually used to slugify.
line 11, 12: select the slug & title elements and assign it to variable slug & title respectively.
line 13, 14, 15: add an event listener to listens to keyup event on the title element. Each time a user types a key into the title input element, the value of the slug input element is set to the slug version of what is typed in the title input. The number 50 passed as an argument truncated the title's input value to 50.

References
Final Thoughts
The 'how to' create a slug based on the value of title field/input was explained in this article.
The fact that you did not have to worry about writing Regex (Regular expression) to replace or remove the reserved characters in the title input value to create a slug based off that value attests to django being battery included.
Django: The web framework for perfectionists with deadlines. 💖💯
With the knowledge of URL encoding, you should understand why you have links that look like similar to this:
https://api.whatsapp.com/send?text=Write%20a%20*secret%20anonymous%20message*%20for%20me..%20%F0%9F%98%89%20I%20*won%27t%20know*%20who%20wrote%20it..%20%F0%9F%98%82%E2%9D%A4%20%F0%9F%91%89%20https://www.anonime.xyz/user
Copy and paste this link in a browser address bar and you notice that it actually contains emojis, apostrophe and other characters.
Thanks for reading up to this point.
Don't forget to clap, like, comment & share.